by: David Irwin, IZCC #13,674
as of: 18 Oct. 2006
CLICK HERE FOR BUILD INSTRUCTION AND BUILD YOUR OWN
These instructions are pretty basic, as is the installation of your new harness. See installation pictures below the written text, at the bottom of this page.
By installing the harness, you will reduce the flow of high amperage through the fuse box, the headlight switch, the high beam switch, and the stock wiring harness. And in return, the switches, stock wiring harness, and fuse box will last up to 80% longer than any same year Z without the harness or similar upgrade.
If you have any questions about this product or its instructions, feel free to E-mail or call me between 10am - 7pm pst. (360) 653-8510 ask for Dave or E-mail wolfin32z@yahoo.com I'll get back to you as soon as possible.
NOTE: Do not use the Zip-ties to fasten the harness down until all connections have been made. If you do, then find out you need more slack somewhere down the line, youÕll have to cut them off and start re-zip-tying over again.
1) Disconnect the battery's (+) terminal (if you are using a circuit breaker, and you're going to connect the new power wire to it, break the circuit at this time.
2) Remove the 30-amp fuse from the inline fuse holder on the new harness, set aside.
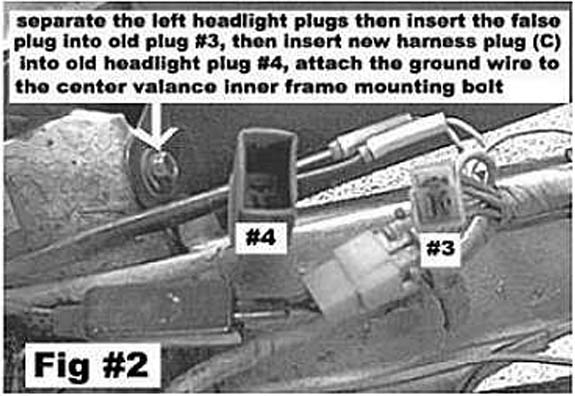
3) Remove the screw from the rear most side of the voltage regulator. If it has a condenser on that screw, relocate condenser to the front screw of the regulator.
4) Mount the relay pack using the pre-mentioned screw. (Fig #1 below) Remember to first put the screw through the ring of the new grounding wire then through the relay's mounting hole. Tighten it down but don't break the plastic of the relay's mounting hole.
5) The wires of the pack should be facing downward, run the fuse and power wire towards the battery, running along the stock harness near the frame of the vehicle. Then upwards toward the battery but DO NOT connect it to the battery terminal yet.
6) Route the remaining wire forward through the lower radiator support hole that the stock wires go forward through.
7) Lay the harness so that the (A) and (B) plugs are close to the hole you just routed them through, (Fig #3) and the (C) plug and its wire are on the left side of the car, near the headlight plug on that side. (Fig #2)
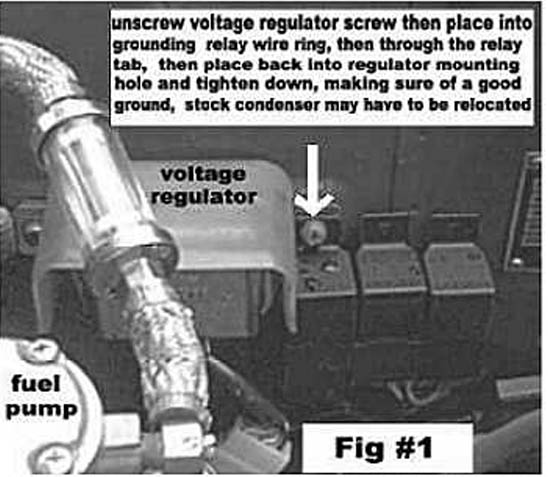
8) Find and unplug the headlight plugs (look under the fender and follow the wires going away from the headlight housing to the plugs on the stock harness) on both sides of the vehicle (Fig #2 and #3)
9) Connect the new harness's molex plug into its perspective plug on the stock harness (using Fig #2 and #3, plug (A) into plug (#1), plug (B) into plug (#2) plug (C) into plug (#4) and donÕt forget to put the (False) plug into plug (#3) it makes it look cleaner and keeps the dirt out.
10) Remove the bolt that holds the center valance to the inner frame (Fig #2 and #3)
11) Clean the area around the bolt with a grinder or dremel type tool to insure a great ground, This is very important to the headlight's new power and a step you should not skip.
12) Bolt the new ground wire (coming from the new harness plugs) to the freshly ground area using the bolt you pulled earlier.
NOTE: If you no longer have a center valance and the bolt has been removed, find another bolt to put in there or drill a new hole and use a new bolt. You MUST ground this wire, or the headlights WON'T work.
13) Use the stock wiring harness mounting tabs when ever possible and the supplied Zip-ties when necessary. Once all connections have been made and double checked, and the new harness is secured to the car, connect the new harness's power wire to the battery terminal and reconnect the terminal to the battery and tighten down.
14) Replace the 30 amp fuse into the weather resistant in-line fuse holder and close the lid.
15) Turn the headlights on and check to make sure both lights are operating correctly.
16) Check the high beams while you're at it.
17) Buy some 5 amp glass style fuses to replace the 10 or 15 amp fuses that are currently in the fuse box for the left and right headlight.
18) If you have any problems at this point, contact me with the info on page one.