Created : 971002
Last updated: 981109
So that if I ever have to do it again, I have recorded what I did in order to replace my stock air intake unit, with an after market air intake unit. I have successfully done this twice to both my Z's.
Suggested tools :
10mm socket with socket extension
10mm box-end wrench
8mm wrench (could have used 8mm socket)
philips screwdriver with fairly large head
airfi001.gif
============
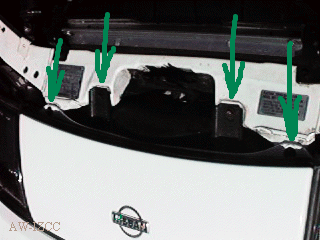
Here is my car. I open the hood to get access at the screws necessary
to remove the center piece. This is the piece between the two headlights.

airfi002.gif
============
Here is a better shot of the center piece. Notice the four screws that
I have to remove. Two on the left side, and two on the right side.
airfi003.gif
============
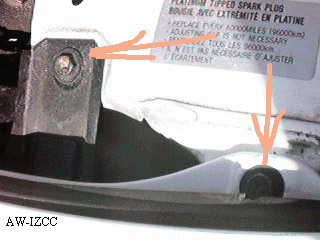
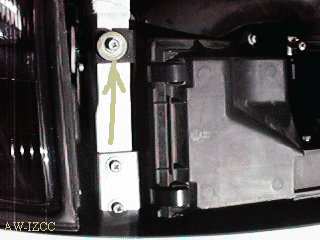
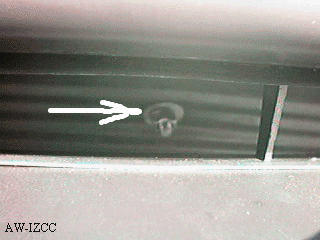
As an example, here is a closer look at the two screws I'll have to
remove on the right hand side of the center piece.
airfi004.gif
============
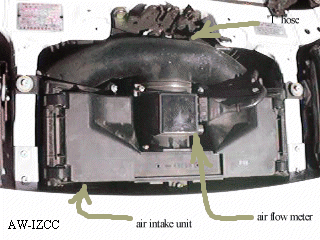
This is what is underneath the center piece. The stock airbox. Notice
the big rubber hose running from left to right in the picture? This is
a "T" shaped hose, with a square box attached at the bottom of the "T".
This square box is the air flow meter. Be very careful when handling this
piece. And below this combination is the black plastic air intake unit.
airfi005.gif
============
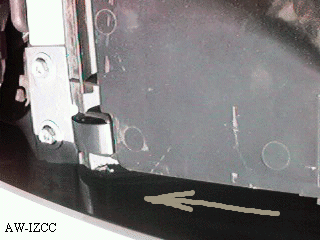
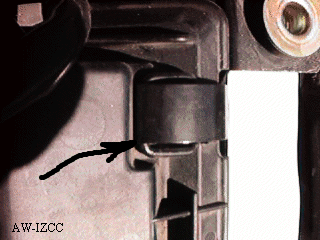
To unmount the air intake unit, there are a number of steps I must
do. First, there are four screws that mount the air intake to the chassis
of the car. Two on each side of the air intake unit. One on either side
that is very easy to get to. See it? It's mounted onto chassis readily
exposed. Here's a picture of it on the left side.
airfi006.gif
============
And then there are two that are really a 'pain' to get to. They are
screwed in deeper towards the bottom part of the air intake unit. It's
tough to point out. Whereas the screw for the top part of the air intake,
is both above and exposed, and to the top left (and top right), this screw
is 'below' and hidden, but is of the same size. I found using a stunted
philips screwdriver, or using a piece from my rachet set, with a short
extension only attached to the piece.... to be the two easiest ways to
get them off. If easy is something one can call it. I had to be patient
on this one... I don't want to be dropping my screw drivers in my car.
If it is too painful, you can wait until step 14 (when you've removed the
top of the air filter box, and removed the air filters themselves) then
try again when you have a little more room.
airfi007.gif
============
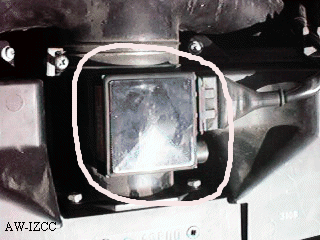
So, here we are at the air flow meter box.
airfi008.gif
airfi009.gif
airfi010.gif
airfi011.gif
airfi012.gif
airfi013.gif
airfi014.gif
airfi015.gif
airfi016.gif
airfi017.gif
airfi018.gif
airfi019.gif
Phew.... well... that's how I went about changing my stock air intake
box unit, with the aftermarket air intake unit.
============
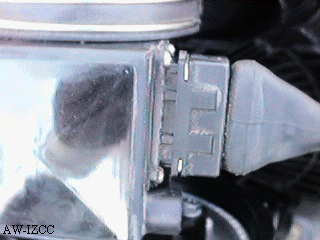
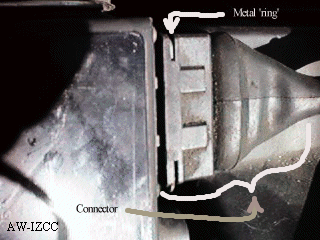
On the right hand side of the air flow meter, is a connector for wires
connecting into the meter. This must be removed. Before I yank at it...
I must remove a small, slim, rectangular shaped metal 'ring'. This helps
prevent the connector from accidentally disconnecting itself during 'spirited
driving'
============
On the air intake unit, there are four clips that hold the air intake
unit cover onto the base unit. They are in each corner of the air intake
unit. Here's one of them at the top right hand side. I should now proceed
to unclip these. Also notice the missing screw from the air intake unit
mount? Remember? I removed these at the beginning of this process.
============
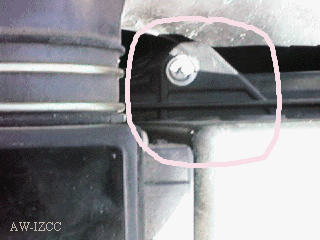
Ok... now, where's the air flow meter again? Oh yeah... here it is.
On the left hand side and where the air flow meter joins with the air intake
hose, there's a clamp holding these two pieces together. I want to loosen
this screw up. Because when I remove the air intake unit, I will be removing
the air flow meter still attached to it as well. I don't have to remove
this screw... but keep it pretty loose.
============
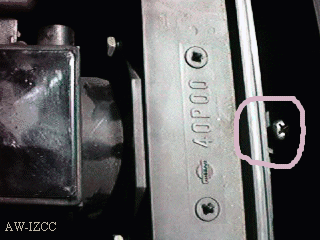
Ok... now I'll remove two screws that also hold down the cover of the
air intake unit onto the base unit. There is one on either side of the
air flow meter. See it?
============
Ok... there is yet another screw... this one is a long screw. This
is mounted close to the bottom (meaning near the bumper) between the air
intake unit, and the bumper. This is a long screw, and I just have to loosen
it enough so that I can pull it out. I think there is a slip nut in there,
so that I can't pull it completely out of the air intake unit. At least
not easily. Doesn't matter.. I don't have to remove the screw.
============
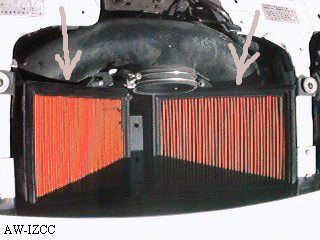
If I now remove the cover of the air intake unit, I will see two red
air filters.
============
Remove them and this is what I should see. Now.. I also see a 'splash
guard' below the air intake unit. This is to prevent water from splashing
up. There are two screws that mount it to air intake. When I remove the
screws... the splash guard will still be attached to the car towards the
bumper side, but towards the dash side, it will just droop.
============
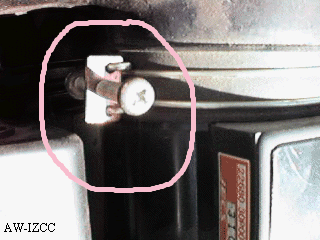
Ok, there are two hose clamps on either end of the 'T' air hose that
I have to loosen. I'll have to loosen it because as I remove the air intake,
the 'T' air hose, will naturally want to twist with the air intake. Instead
of twisting the hose, if I loosen the hose clamps, there'll be less resistance.
Ok... once I've done this... and hopefully I've been doing my chest exercises

============
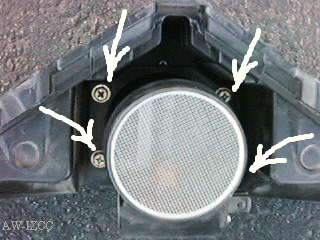
Congratulations... I've past the worst of it. As I can see, here is
a picture of the air flow meter unit facing up at I. It's still attached
to the air intake unit. Remove the four bolts on the air flow meter so
that I can separate the meter from the box unit. Be careful not to lose
the little gasket/washer that is currently sitting between the air flow
meter and the air intake. The air flow meter's got a nice little groove
for it to sit in. But it sits there without any glue, or anything.
============
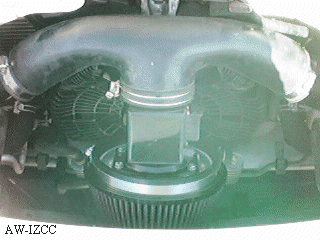
Ok... now mount the air flow meter onto my new air intake unit. Don't
forget the gasket/washer between the air flow meter and the new air intake
unit. I'll now have plenty of room to install the new air flow meter/air
intake unit back into the 'T' intake hose. Turn the air intake combination
downwards a little so that it's angled down. Then re-tighten the hose clamps
on either end of the 'T' hose, and re-tighten the screw for the clamp connecting
the air flow meter with the 'T' hose.
============
If I have the air intake unit that has a bolt at the top of it (the
end that is now pointing downwards), I now should push that bolt through
(yes, as in piercing) the splash guard, and bolt the air intake unit onto
the splash guard. This will help prevent the splash guard from bouncing
around.
============
Last step... re-connect the connector to the air flow meter, and re-mount
the rectagular shaped metal ring. Re-tighten everything that had been previously
loosened (hopefully, I remembered to mention all the re-tightening steps...
but just in case). And then re-install the center piece.