How to do a transmission removal and clutch replacement
By Brian Duley


I. Warning:
Removing a transmission and replacing a clutch is a complex and time-consuming procedure. By replacing it yourself, you alone are responsible for the safety and functionality of yourself and vehicle. If you do not want to take that chance, I recommend that you take you car to a Nissan certified mechanic. This article was written after my clutch was replace and the transmission was re-installed. It is very possible that I left out a few steps or remembered them differently. Read the entire article before starting, you may find something too challenging for your level of skill. If you have any additional information that you would like to see added to this page, send me an email.
A. Sockets: 10mm, 12mm, 14mm, 17mm, torque wrench, socket wrench, 3/8" universal joint, extensions (total of at least 20" long combined). Oh, maybe some duct tape.
B. Wrenches: 10mm, 12mm, 14mm, 17mm.
C. Automotive support and lift tools to lift the car high and support the car safely: jack stands (4 large ones preferable), ramps (to place under tires for extra safety), suitable transmission jack (see below).

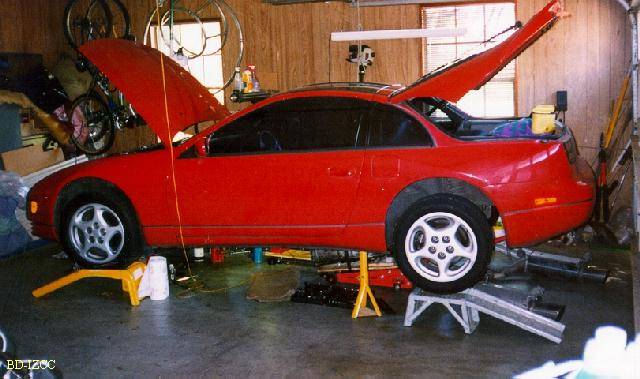
Note: The car is lifted very high off the ground and can become unstable the higher you lift it. Look how high my car is off the ground. I used 2 jack stands and 4 ramps (only 2 touched the tires the other 2 ramps just for safety if the car was to fall. The car should be level when lifted up. Don't get one end higher than the other.
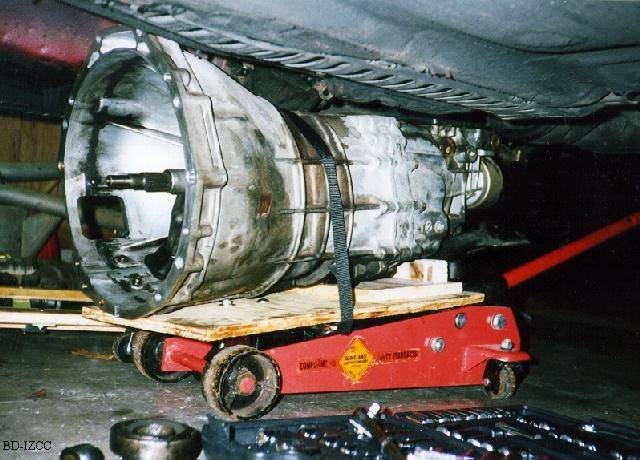
Below is a picture of my floor jack that I converted to a transmission jack. I bolted a piece of plywood (aprox. 1'x2'x3/4") to a floor jack and used a 6' nylon strap with ratchet mechanism to secure it. You may need a few pieces of wood to hold the transmission at the correct angle. It is very important not to put the center of gravity of the transmission beyond the base of the floor jack because it will tip over. The transmission is very heavy, expensive, and awkward.

You can also rent or buy a real transmission jack. A scissors transmission jack will cost about $60 to $70. A hydraulic transmission jack will cost about $120 to $180. These prices are from a Northern Hydraulic catalog, which has tons of tool and shop equipment. I could not find a place in town that sells one so I made one. You can also rent a transmission jack, look in the yellow pages under rentals.
D. A creeper is useful ($20-$40).
E. Clutch kit (usually includes clutch plate, pressure plate, throw-out bearing, a pilot bushing). I bought a Cyclone full Kevlar clutch from Clutch Masters for about $550. I did not replace my pilot bushing.
F. Plastic clutch alignment tool is a must, it only costs $2-$3 and works for most Nissans/Datsuns (some times included in clutch kit).
G. Rear crankshaft oil seal ($17) and some high temperature gasket maker ($3). (Both are optional but highly recommended. You are a fool if you don't. I don't want to hear about any one who has to remove their transmission again to replace that seal). I also recommend that you replace the two PCV (Positive Crankcase Ventilation) valves ($4 each) because if they get clogged, pressure will build up in the crankcase. The hot gasses will most likely escape through the rear crankshaft seal. The hot gasses also causes the rear crankshaft seal to become hard and brittle much like the hoses that connect to the PCV valve. Hard brittle PCV valves hoses are nearly impossible to reinstall, so get the original hoses or buy some straight oil resistant PCV valve hose. You will also experience a big puddle of oil on your garage floor if either PCV valves or rear crankshaft seal is bad. I also recommend replacing both PCV valves and PCV valve hoses before you replace the rear main crankshaft seal. The job is independent of the rear crankshaft seal removal.
H. You need to get your flywheel resurfaced (after you remove the tranny). It cost me $25 to get the flywheel resurfaced, the Z has a single step surface, double step surfaces cost more. Call a few automotive machine shops or transmission shops to get a price for the resurfacing. You may want to buy a lightweight aluminum flywheel from Stillen ($300 I think) but I think you still need to have it resurfaced so ask Stillen for more details.
I. Nissan recommends lubricating some parts with Lithium grease. So you many need a grease gun and some grease.
J. It is a good idea to change your manual transmission gear oil. I only recommend Redline MTL or Redline MT-90 synthetic manual transmission gear oil. The service manual say you need 5-7/8 pints (almost 3 quarts) or 2.8 liters of API GL-4 gear oil for a TT or NA. I paid $8.25 for a quart of Redline MTL and you need to buy 3 quarts. It is worth it!
K. The transmission removal and installation is much easier to do if you have a friend to help you. One person can remove and install every thing else.
L. I recommend you read How to change your center support bearing & transmission mount by Tom Bell. You may want to replace something else or get more information about removing some parts.
III. Automotive Hints:
1) When you remove a bolt, it is a good idea to screw the bolt back in after removing the part. That way when you put the part back in, you have all the screws where they belong.
2) Group bolts and nuts after you remove them. Put them in a plastic bag (zip-lock) or container that you can label. One bag for exhaust bolts, one bag for tranny bolts, etc...
3) Use a hand held florescent shop light. Flashlights suck because they go dim after a few hours. Standard household light bulbs burn out when you drop the light.
4) When I say, "remove the 10 mm bolt", that means use the socket or wrench you need to use is a 10 mm. The hex head has a 10 mm diameter. The treaded part of the bolt is actually 6 mm in diameter.
5) Since you are saving a few hundred dollars by replacing the clutch your self, you should invest some money in some useful tools for the job (hand tools, tranny jack, air tools, etc.). You may want a Nissan service manual for an additional reference. I got mine for $73 from Dyment Distribution Services (800) 247-5321. You can also get a free 90-96 Sales Brochures Too! Look in the back of your owner's manual.
6) Read the entire numbered instruction before you perform the task. I may give you a hint towards the end of the instruction that would be useful to know before the performing the task.
7) You also may want to gut you precats because with the transmission remove you can remove the down pipes completely and it will be easier and much safer to do than if the transmission was still in the car. I recommend that you read the TwinTurbo Dallas tech page on Pre-Cat Gutting. Gutting the pre-cats are not needed to replace the clutch, it is optional.
III. Remove the exhaust:
1) Remove the mufflers and the H-pipe all in one piece.
2) Remove the catalytic converters.
IV. Remove the starter:
1) Disconnect the negative battery terminal from the battery
2) Remove the small heat shied from the starter. (There are 2 heat shields on the starter). There are two 10 mm bolts that hold it in. One bolt is on the top and one on the bottom.
3) Remove the bottom nut (14 mm) that holds the starter to the tranny.
4) Remove the top bolt (14 mm) from the starter. You need a medium length 14 mm closed-ended wrench; the longer ones will not work because the turbo is in the way. I used a 16" pipe to push the end of the wrench because you can't get any leverage on the wrench with your hand.
5) Make sure negative battery terminal is disconnected from the battery. Then disconnect the big positive battery cable from the starter with a 12 mm socket.
6) Disconnect the starter solenoid wire.
7) Remove starter.
V. Slave Cylinder removal:
1) Remove the two bolts that hold on the slave cylinder to the tranny.
2) Tie the slave cylinder to the power steering rod. To keep it out of the way and not bend the hose too much.
VI. Remove the drive shaft:
Note: there are two drive shafts. You want to remove the drive shaft on the transmission side. The two drive shafts are connected using four 17 mm bolts.
1) Remove heat shield.
2) Place a long steel bar in the u-joint to prevent the drive shaft from turning. The transmission should be in neutral.
3) Remove the four 17mm bolts that hold the two drive shafts together. I used an 18 mm socket on my torque wrench due to clearance and limited torque of other methods.
4) Remove the 2 bolts that hold the drive shaft bearing support.
5) Jiggle the drive shaft to remove it from the transmission. It pulls straight out.
VII. Transmission removal:
Note: You should use jack and wood block to press up on oil pan or disconnect air intake hoses to prevent engine from tilting back too far (maybe radiator hose too) when the tranny is removed. I recommend that you use a jack and a wood block.
1) Remove the 6 of the 8 bolts (14 mm) that hold the transmission to the engine. Keep the far left and far right ones in to hold in the transmission; you do want to loosen them up. The 2 bolts on the top are very hard to get to, this is where you need the 14mm socket attached to the 3/8" u-joint attached to about 20" worth of extension attached to a torque wrench or a socket wrench with a breaker bar/pipe. This is where the duct tape comes in handy. You may want to wrap some duct tape around the socket u-joint to prevent it from wobbling too much. It takes some time but good luck. You may want to remove battery to see top passenger side transmission bolt.
2) Remove 4 of the 6 bolts (14 mm) that attach the rear transmission mount bracket to the car.
3) Remove the 4 bolts for the gear shift knob support bracket that connect the tranny to the bracket.
4) Remove the bolt that connects the gear shift knob to the tranny, right at the small u-joint.
5) Remove the three wiring connectors at the top of the tranny.
6) Move transmission jack into place and strap tranny to jack using appropriate shims where necessary. Use a strap with a ratchet mechanism to reduce the transmission's movement on the tranny jack.
7) Remove the 4 remaining bolts that hold the tranny in. Two between the tranny and engine, two between the tranny mount and car.
8) Slide tranny and jack (don't just pull the jack only) towards rear car and lowering the transmission slightly. You want to keep the tranny as horizontal as possible. Make sure the gear shift know support bracket clears the top of the tranny.

VIII. Pressure plate and clutch disc removal:
1) Brace fly wheel from turning. A flat screwdriver and jack are useful.
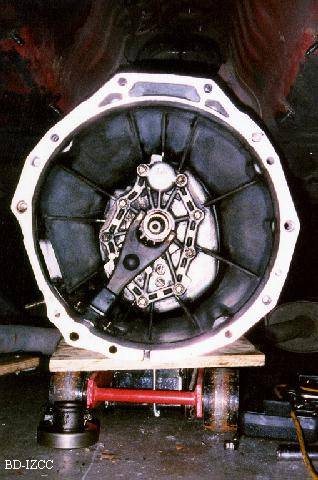
2) Remove bolts. (The pressure plate is the white thing below)

Below is a picture of the old and new clutch disk, pressure plate, throw-out bearing, and pilot bushing.

IIX. Fly wheel removal
1) Brace flywheel.
2) Remove the eight bolts that hold the fly wheel. (See picture below)
3) Remove the two dust covers.
Here is what my resurfaced and re-installed flywheel looks like.

IX. Rear Crankshaft oil seal removal
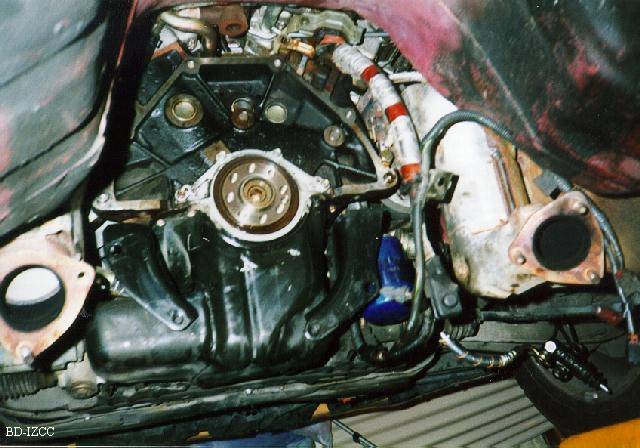
1) Use a hammer to hammer a medium sized flat screw driver to between the very top-center of the crankshaft oil seal (the brown thing in the picture below) and the oil seal retainer bracket (the silver/aluminum thing around the brown oil seal). Once you hit the small bracket behind the seal, pry out the old oil seal by pressing the screwdriver handle upwards. The small brackets behind the oil seal are at 12, 3, 6, and 9 o'clock which prevent you from hammering the screwdriver in too deep. Be very careful to not scratch the crankshaft (the part that the flywheel bolts into). Scratches could cause a permanent oil leak. Keep the old oil seal, you will need it to reinstall the new oil seal, because oil seal should be recessed.

Installation
X. Rear Crankshaft oil seal installation
1) Put the new oil seal into place. Place the old oil seal upside down on top of the new oil seal. Hammer the old oil seal to press the new oil seal into place. The new oil seal should be slightly recessed just like the old oil seal. Hammer lightly at first. The oil seal should go on evenly. Once the oil seal is on, you may have to hammer the old oil seal harder to recess the new oil seal properly.
2) Clean any oil between the crankshaft oil seal retainer and the oil pan. Use some high-temperature silicone gasket maker to fill that gap. Make sure it is flush, you do not want the flywheel to rub against the gasket maker.
XI. Flywheel installation
1) Resurface flywheel (about $30).
2) Install flywheel dust covers.
3) Install flywheel
4) Clean flywheel surface of any grease, oil or dirt. This is important for the new clutch to grab properly.

XII. Clutch and pressure plate installation
1) Hold new clutch plate into place and put clutch alignment tool into place to center and hold clutch plate.
2) Bolt pressure plate into place and make sure that the three flywheel studs are seated in the proper pressure plate holes.
XIII. Tranny and other Installation stuff
1) Make sure you do no pinch the engine ground cable between the engine and the tranny. The cable should be bolted to the outside of the tranny at the very top, top-left.
Follow removal procedure in reverse to install other parts.
XIV. Clutch pedal travel adjustment
This may be necessary to get the clutch to engage properly. In my case the car acted like I was only pushing the clutch pedal half way, when I was actually pushing all the way to the floor. To test, come to a complete stop on a level road, push the clutch all the way in and put your car in first gear. If you car inches forward then it needs adjustment. You should start to inch froward when you release the clutch petal about an inch. To make the adjustment the car should be off. Look under the dash. The clutch pedal pushes a shaft into the clutch booster (similar to a break booster). The shaft is threaded and there is a 14 mm nut that prevents it from turning.
1) Use a 14 mm open end wrench to loosen the nut that is on the break booster's shaft.
2) Turn the break booster shaft with a pair of needle nose pliers.
3) Tighten the 14 mm nut.
4) Repeat process until clutch engages normally.
Additional information
Comments? E-mail me.
Last update: 1/14/98