90+ Nissan 300ZX Timing Belt Replacement
[Thanks to Joe Fabbre for his contribution in this scarey task. Car shown is his 91 300ZX NA. Andy 9705]
[Thanks to Steve Chong for his comments and suggested changes (based on his own experiences with his 90 300ZX NA), which Joe agreed with and therefore have been blended in with Joe's procedures. Andy 9707]
[Thanks to Steve Chong for his additional notes (based on his recent experiences with his 90 300ZX TT.... yes.... he owns 2 90+ Z's). These notes are at the end of the procedures, right after the parts and price list. Andy 9710]
Intimidating...ehh? Not really, anyone with a little bit of experience working on cars can probably handle this job. Before I did this project, the only repair I had performed was replacing an alternator in a Subaru. This is definitely more complex and time consuming, but if you have some time to kill and want to save some money, DIY is the way to go.
When I did this to my car I had an oil leak in one of the cam shaft oil seal. This caused oil to leak all over the place and ruin my alternator. So, when I replaced the timing belt I also replaced the cam shaft oil seals and the
alternator. I have broken this procedure into three parts. The first is getting down to the timing belt. Next is replacing the cam shaft oil seals, and last is putting it all back together. I have also listed the parts I needed at the end, and the cost of these parts.
One last note. I would highly recommend buying the service manual. Even though there is little detail in it, it is a very handy reference.

1. Remove engine under cover.
(No picture) Jack the front end of the car up and remove the big plastic
cover that is directly under the radiator and everything else you'll need
access to. When I did this three outta the six bolts broke due to rust.
Use some WD-40, drilling broken off bolts out is no fun.
2. Drain coolant from both cylinder block drain plugs, and
radiator drain cock.
I failed to drain the coolant from the cylinder block. The bolts on
the cylinder block are very hard to get to. It may not be worth it if
you don't mind cleaning up some coolant when you remove the water inlet
and outlet later on. Have a container ready, under the car, that will
hold about 3 litres (half a gallon) that is around 30cm by 30 cm (1ft X 1ft)
to catch the coolant.
3. Remove radiator.
There are two bolts at the top of the radiator and two
hoses connected to it. Undo these and lift it out. Note that the bottom of
the radiator cowl can be unclipped to make it easy to pull the radiator out.
If yor car is an auto, undo the transmission cooler pipes on the radiator,
and plug them with a 3/8 inch bolt- threaded part cut
off- to stop transmission fluid from leaking out.
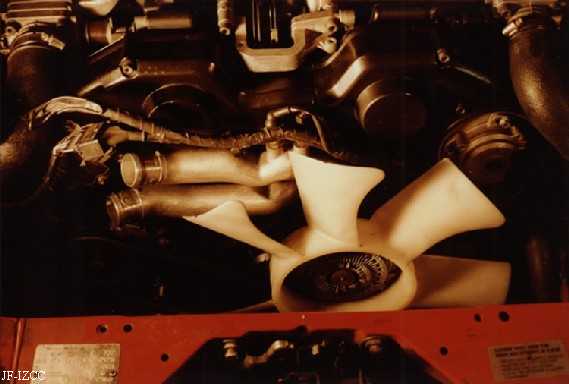
4. Remove drive belts, cooling fan and coupling.
The belts all have adjustment bolts that tighten and loosen
the object that the belt is connected to. I am probably
making this sound more confusing than it really is. The fan
has four little bolts, the coupling has four nuts that
connect it to the water pump. To make it easy to move the power steering and
alternator belts, slacken off the alternator and power steering hinge bolts
also. The power steering pump will be hard to move
because of the heavy hoses connected to it. Wind the adjustment bolt for
this almost right out, so that the end of the adjuster wont catch on the
alternator braket when you try and move the power
steering pump
5. Unplug the negative terminal from your battery. (Prevents a fun
little jolt when playing with the starter.)
6. Remove the starter motor.
It is right behind the oil filter. The manual says you
have to remove the two heat shields first. I did this
and it was a major PITA. When I put it back on I put
the heat sheilds on first, then installed it. It was
much easier this way. If I ever do it again I will not
remove the stinkin heat sheilds.
**Another list member (Darryl) pointed out that you can
just take out the main bolt and nut holding the starter in,
then pull it out enough to put a bent screwdriver or other
tool in place. This sounds much easier than taking the whole
thing out.
If you have a manual transmission, to save you undoing the starter motor,
you could put the transmission into 5th gear, chock the rear wheels, and put
the handbrake on firmly. This should hold the crankshaft enough to allow you
to undo the crankshaft bolt.
7. Remove the crankshaft pulley bolt. You need a 27MM socket
for this bad boy. Insert a big flathead screwdriver
at the bottom part of the gear that was revealed when
you removed the starter motor. This will keep the crank-
shaft from turning when you are trying to remove the
cranshaft pulley bolt. NOTE: The crankshaft pulley
bolt on this car is NOT reverse threaded. Remove it
like all of the other bolts. Also, you will probably need
someone to hold the screwdriver in place, while you jump
around on the bolt with the socket wrench.
8. Remove the crankshaft pulley. You are going to need a puller
for this job. I bought a nice one at Sears for $30, not
realizing I could borrow a nice one from either Pep Boys
or Super Track for free. >:\ I put the crankshaft pulley
bolt in part way in order to give the puller something
to pull against. It even has a rounded out area on the head
of the bolt that looks like it was made for this.
The crankshaft pulley has two 6mm threaded holes in it to allow you to
insert the puller bolts. If you have a piece of 1/4 inch iron bar and a 3/8
nut and bolt and a couple of long 6mm bolts, you could make your own puller
up quite quickly
9. Remove the water inlet and outlet.
These are the two aluminum pipes that had the radiator hoses
connected to them. I had to buy the longest allen wrench
Sears had in order to get a the bolts holding these guys in.
The allen wrench size required is 6mm. You can also buy an allen wrench that
has a 3/8 inch drive, and using a 6 inch extension on this with your ratchet
makes getting these things out easy
Prepare for a flood if you did not drain the cylinder block
of coolant.
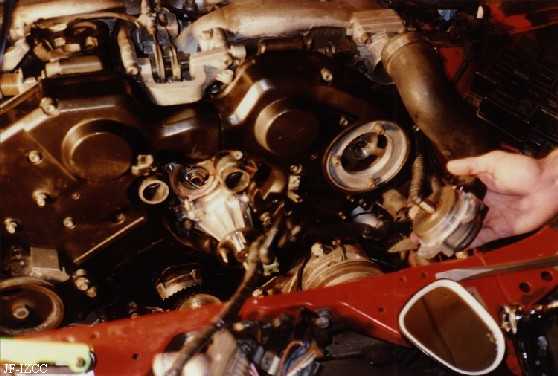
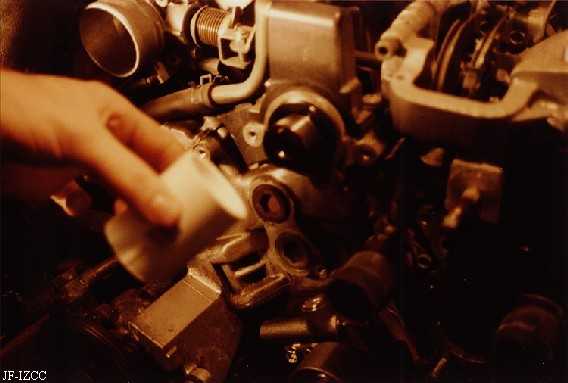
10. Remove the crank angle sensor. Three little bolts. No problem.
Here's a pic of my friend holding the crank angle sensor.
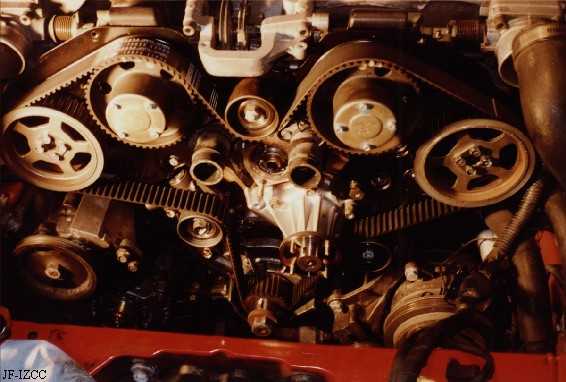
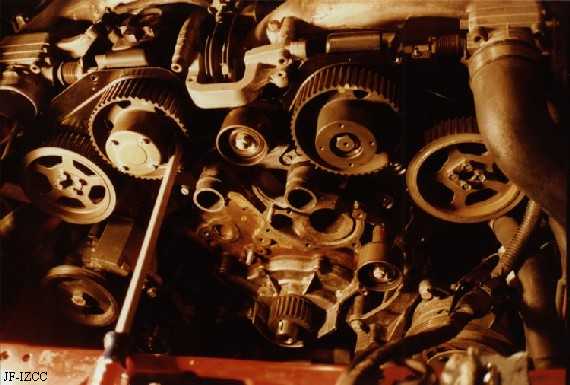
11. Remove the front timing belt covers. Bolts galore. Most need
allen wrenches.
This picture shows the timing belt. The auto tensioner is just to
the left of the water pump (which is the clean part in the middle of
the timing belt loop).
12. Install a 6mm bolt by 16mm long into the auto tensioner so it doesn't slam
forward when you take it out. You should see a hole for this
on the right side of the tensioner.
13. Set the No. 1 cylinder at top dead center (TDC) on its compression
stroke. You will know you are at TDC when all five of the aligning
marks (4 on the cam sprockets and one on the crankshaft) match
up with the marks on the back timing belt cover and oil pump housing.
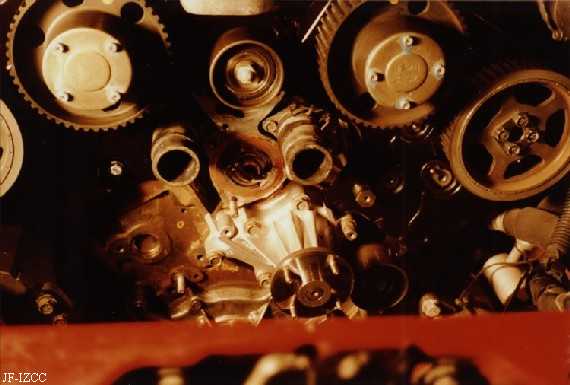
14. Remove the autotensioner and the timing belt.
This picture shows the timing belt off, and the auto tensioner removed.
The following is the camshaft oil seal replacement procedure.
Yes, you need to remove those four gears. Two of them have cover plates on them. Be careful taking those off. They are spring loaded to hold in a big bolt behind the plates. After you get the plates, and springs off you have to remove that big bolt. There are some holes in the sprockets. You can stick a screw driver in these holes and wedge it between one of the bolts holding the back timing belt cover on. You can also use a 10mm "deep socket" on an extension, and hold it onto one of the two back cover plate bolts that you can see through the cam sprocket. If you use this method, you wont scratch the back cover plate, Should look something like this:
Be careful not to let the sprockets slam around too much. They will want to rotate with a lot of force once you turn them a certain amount. The first time this happened to me, it scared the sh*t out of me. I was much more careful after that. It really helps to have a partner help you out with this part. If you use the deep socket method, you wont need a partner. Those two with the round plates are the intake cams. (After reading this over I didn't think it was clear enough... You need to stick the screwdriver in the sprocket to keep it from rotating while you unscrew that bolt.) The exhaust cams are a little easier. There are four smaller bolts that hold these on. these are an uncommon size: 7mm. Use the screwdriver as a wedge again with these. They are a lot easier because they are much more open. After these are off, take the back timing belt covers off. You should be able to see the seals now. Here is a pic of the right side cams sans sprockets:

The manual says you can get them out by prying on the inside of the ring. I was unable to get them out this way and I was really worried about scratching the camshaft. Be *very* careful not to scratch the camshaft or you will have a very expensive oil leak to fix instead of a cheap one. Anyhow, I took a medium size flathead and placed it at an angle on the outside of the ring. Then I took a hammer and tapped it forcefully but carefully until I slightly bent the oil seal. Then I was able to get in around the outside of the seal and pry it off. Here is a pic with the screwdriver in place:

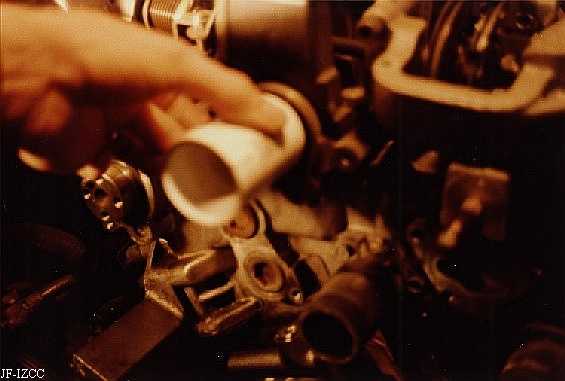
For re-installing the seals, I went to home depot and bought a pvc joint (short peice of that white plastic pipe) that exactly fit the oil seal.
Tap around the pvc to put the oil seal in place. Make sure you oil up the seals before you put them in. The one's that go on the exhaust camshaft are kindof a tight fit. Be patient, they'll go. Make absolutely certain they all go on straight.
Here is the rest of the timing belt replacement procedure.
1.  Make sure all of the aligning marks are lined up.

2.  Manual says to remove all of the spark plugs at this point.
    I think it is to releive the compression when the
    gears get rotated later.  Not really sure if you need to
    do this or not.

3.  Set the timing belt in place.  Make sure the arrows face forward.

4.  Use a vise or clamp to adust the auto tensioner to 4mm of space
    in the gap. ***Do NOT try to do this adjustment by cranking down
    the screw.***  After you have squeezed the thing down to 4mm,
    screw down the holding screw.

5.  Put the auto tensioner in.  You will probably need a big screw
    driver to pry it over into postion to put in the bolts.  Finger
    tighten the bolts.

6.  The manual takes a whole bunch of steps now rotating the
    cams back and forth.  I did this, but didn't really see the point.
    You basically want to pry the tensioner over some more (not too
    much) and tighten down the two bolts and nut that hold it in
    place.  I definitely did this section by feel.

7.  Measure the deflection of the belt on both sides of both exhaust
    cams.  Make sure the average of these deflections is between
    6 and 7mm.

8.  Make sure the auto tensioner is tight and in place, then remove
    the stopping bolt.  The auto tensioner should not move much at
    this point.  Wait for five minutes then make sure the projection
    of the rod in the tensioner is between 3.5 and 5.2 mm.  Mine did
    not move at all when I took out the stopper bolt.  Lucky I guess.

9.  Give it a once over to make sure nothing has slipped and the belt
    looks like it is lined up well on all of the sprockets, then put
    the timing belt covers back on and everthing else that came off
    beforehand.
Here is a list of the parts I had to buy, along with the list price and price that I paid. I got everything from my local dealer except the cam shaft oil seals. I think you can get even better prices from NISSAN Auto Parts dot com .
Part                                     List        Paid
------------------------------------------------------------
Timing belt cover gasket-fr               8.50        6.80
Timing belt cover gasket-cov             13.19       10.55
Water Pump                               87.67       70.14
Fan Belt                                 14.05       11.24
Power Steering Belt                      17.38       13.90
Compressor Belt                          17.38       13.90
Timing Belt                              46.95       37.56
Alternator                              265.04      212.03
Windsheild wiper fluid valves             5.91        4.72
Thermostat                               13.50       10.80
Auto Tensioner                          153.82      123.20

Cam shaft oil seals (4) *Not from dealer* 5.99 each= 23.96
------------------------------------------------------------
                                                    538.80
Supplementary notes for the 90TT and further tips for 90NA by Steve Chong
Notes for the 90TT
Surprisingly, changing the cambelt and seals on the 90TT is less difficult
than on the 90NA, as there are less pipes to undo. Follow the procedures in
section 1 & 2 in Joe's article, then to remove the radiator you need to
disconnect the two rubber air intake hoses that couple up to the throttle
valves. This gives enough clearance for you to remove the radiator. The
radiator arrangement is different in the TT compared with the NA, and
provided you disconnect the bottom radiator hose, you can withdraw the
radiator without undoing the top plastic cowl. The bottom radiator cowl is
clipped in three places (same as the NA). If your TT is an auto you'll need
to disconnect the transmission cooling pipes, but unlike the NA auto, its
best to disconnect them where they join at the alternator support bracket,
because these pipes run up to the left hand side of the radiator, not to
the bottom of it in the case of the NA. You can withdraw the radiator with
the rubber transmission hoses connected to it. I also took the opportunity
to replace these rubber pipes, as they were leaking at the alternator
bracket connection point.
As with the NA, its not necessary to remove the starter motor shields to
remove the starter motor itself. With a bit of juggling, you can get it
past the catalytic convertor air feed pipes. Both starter motor main bolts
are 14 mm, and the nut securing the main cable to the starter motor can be
undone with a 12mm ring spanner.
Notes for the 90TT & 90NA
The Front Seal
If you're going to change the cam seals, then I believe its a good idea to
change your front seal at the same time as it normally only takes a few
minutes extra. Note that for every revolution of the camshaft, the
crankshaft has to rotate twice, so you would expect the front seal to be
worn twice as much as the camshaft seal. Indeed, this was what I found in
my case.
If you have the manual, you'll note on page EM 22 that it says you need to
remove the oil pan and oil pump assembly to change the front seal. This is
not the case, and you can remove it in the same manner as per Joe's
recommendation, which I found easier than what was recommended in the
manual. However, for putting the new front seal back on, make sure your PVC
joint, as shown in Joe's pics is at least 60 mm (2 1/2 inches) long, as it
has to go a fair way over the crankshaft spindle. To get at the front seal,
simply lever the cambelt drive sprocket off the crankshaft. In 99.999% of
cases, this comes off with no problems.
The front seal and all 4 cam seals are physically identical, even though
the front seal may have a different part no.
Problems with the cambelt drive sprocket
In 0.001% of cases (and in my case), the cambelt drive sprocket doesn't
come off easily. Mine was rusted solid onto the crankshaft, and if this
happens to you, make sure you're having a good day first. To get it off I
first tried WD 40 for a couple of hours. This didn't work, so I added heat
to about 100 deg. C (212 deg. Fahrenheit). You can't take the temperature
too high without risking damage to the oil pump seals and O rings, and oil
pump housing gaskets which are directly behind the sprocket. This didn't
work either so I decided to drill 4 holes into the sprocket and tap them
with a 6 mm thread. To avoid removing the air conditioning radiator, and
escalating the complexity of the job, I hired a 10 mm (3/8 in) right angle
drill to drill into this sprocket.
Then I made a puller, using 6 mm high tensile steel bolts to screw into the
the sprocket, and a 10 mm (3/8 in) standard nut & bolt for the main pull.
I wound the 10 mm bolt up so hard the thread stripped, but the sprocket
still wouldn't come off. The next step was to use a high tensile 10 mm nut
& bolt, simultaneously heating the sprocket, and belting the puller with a
hammer. This worked, and an hour later the sprocket was off. This whole
procedure sounds simple, but took me a couple of days to sort out, and I
was relived that I didn't have to grind the sprocket off, which I was
prepared to do as a last resort.
Intake Cam sprockets
These cam sprockets look the way they do because they are part of the
variable valve timing system. At engine speeds below 3000RPM , oil from the
main oil gallery is fed into the sprocket itself, via the camshaft, to
operate a spring loaded gear. The spring loaded gear advances the sprocket
10 degrees relative to the camshaft, increasing low end torque.
If you're taking these things off, take a moment to inspect the back
plate. You'll notice there is a seam between the back plate and the body of
the sprocket, and this appears to be secured by some sort of press fit. If
the seam is loose, you'll be able to rotate the back plate by hand, and if
you can do this, it won't be long and oil will be pouring out the seam
(which happened to me).
I repaired my sprockets by soldering up the seam.
Spark plug removal
The manual says to remove the spark plugs, to make it easier to rotate the
engine for aligning the timing marks and for subsequent belt tension
adjustment. This first time I did this job, I did remove the spark plugs,
but for the next times I didn't bother, and had no problems.
Cambelt alignment
The timing mark on the cambelt drive sprocket (on the crankshaft) is really
tiny, and hard to see. I put a dab of white paint on mine to show it up
more clearly. Also, I put a bit of white paint on the cambelt teeth which
go either side of the drive sprocket timing mark, because you can't
actually see the alignment mark on the belt when you've got it on the
sprocket. I think this is why the manual recommends you count the number of
teeth between sprockets. If you use the paint method, you don't have to
count the teeth. Try counting 59 teeth in an uncomfortable position in a
confined space, without a mistake, and I'm sure you'll wonder if there's a
better way.
Antifreeze
After completing the cambelt/ seal work, and if you did what Joe did,
you'll need 2 liters (1/2 gallon) of antifreeze to retain a 30%
concentration of glycol when you top the radiator back up.
Time taken
This job normally takes 6-7 hours not including complications for a
qualified Nissan specialist in a workshop environment. By contrast, it took
me 16 hours (over 2 days, not including complications) as I'm not a
mechanic or mechanical engineer and don't have a lot of specialized
equipment.
End of document.
Back to the Home Page