
How To Repair Your Side Mounted Rearview Mirrors
I assume no responsibility for any damages
or difficulty you may encounter attempting to perform the following steps.
I am providing these instructions because I needed to repair a mirror
assembly and could not find any information on the subject. I do not have
a factory service manual and do not know if it provides this information,
I would assume that it does, but this is what I learned by trial and error
and I wanted to share it with others that may need to work on these mirror
assemblies.
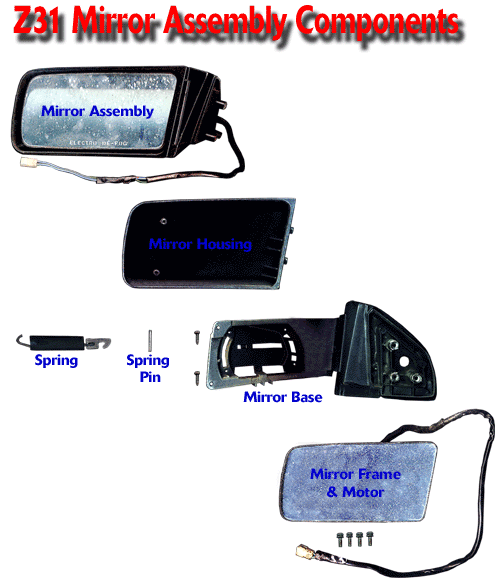
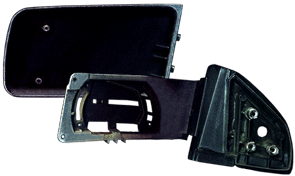
In the image above are the basic components of the mirror assembly. I have named them to allow me to refer to the images for assistance in describing how to perform deferent steps of this step by step instruction text.
I have included additional images through out this text to illustrate the particular step that I am describing.The quality and angle of the images is not the greatest because I had to scan the actual parts and my scanner is not designed for 3D object scanning. I have tried to enhance the area of the image that is described in the related text
You should examine the image above to familiarize yourself with the names of the parts. I am going to proceed under the assumption that you have already removed the mirror from your car.
So lets begin,
1. The first thing to do
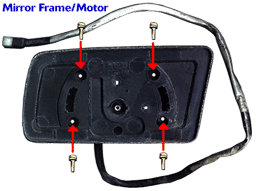
is to gently push the top edge of the mirror inward so that the bottom
edge rises allowing you access to the Mirror Frame / Motor mounting screws.
As you move the mirror you will hear a clicking sound, this is normal.
You will need a long thin Phillips screw driver and a flash light to get
to the screws. There are 2 screws securing the bottom and 2 screws securing
the top. After you get the screws out try to get some slack on the wires.
There is a small access hole in the Mirror Base. It is on the bottom of
the Base next to the Mirror Housing. You can use a screw driver or pliers
to pull the wire into the Mirror Base so that you have enough slack to
pull the Mirror Frame / Motor away from the Mirror Base.
If your mirror is broken or not in the frame you can simply access the
mounting screws through the access holes in the Mirror Frame / Motor. I
would not recommend removing the mirror from the frame to access the screws.
I have not had good luck trying to glue the mirror back to the frame after
it has been removed.
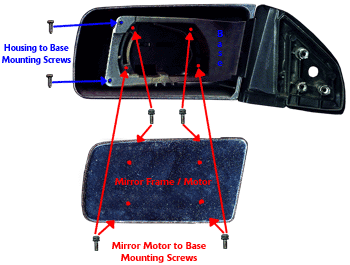
2. With the Mirror Frame / Motor pulled out away from the Mirror Base
you can access the 2 screws that hold the Mirror Housing to the Mirror
Base. After you have removed the 2 Housing to Base screws you are ready
to release the Spring that connects to the Base Frame and the Base.
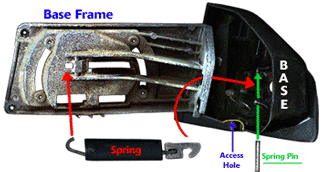
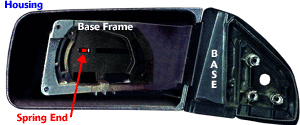
3. The 2 pictures above illustrate the
Spring and how it connects from the Base Frame to the Base. The 1st image
shows the Base and Base Frame Assembly from the rear and shows where the
Spring connects. The 2nd image shows you what you should now see after
step 2. You will need to remove the Spring from the Base Frame. The easiest
way to do that is to use a strong, small tipped, screw driver and put
its tip at the Springs End which is shown in the 2nd image and indicated
in red. You will want the handle of the screw driver to be pointing towards
the Base and the tip against the Spring End, pointing towards the end
of the Base Frame. I have found that holding the assembly in your lap
is the best way to hold the assembly. With the screw driver in the position
described above and the assembly held in your lap, take a regular hammer
and hit the end of the screw driver. It may take a little practice to
get the right angle to keep the screw driver solid against the Springs
End when you hit it. You will need to give the screw driver a pretty hard
smack to force the Springs End off of its seat. BE CAREFUL NOT TO SLIP
AND HIT THE MIRROR HOUSING, it will break!
I know that this is very hard to do. I have tried every other possible
way and this is the only way that I found that works. You may be tempted
to try to drive the Spring Pin out of its mount to free the other end
of the spring, I have already tried that and there is a stop plate inside
the Base that keeps the Spring Pin from moving far enough to clear its
mounting holes. What I ended up doing was splitting the Spring Pin and
that put more tension on the Spring.
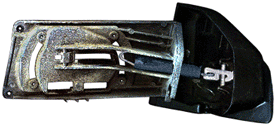
4. Now that the Spring and its tension have been released the Base and
Base Frame can be flexed at their hinge. You can now remove the Mirror
Housing. Pull it off of the Base and Base Frame (as shown in the 1st image
above) and set it aside. Next you will want to take the end of the Spring,
that has the hook on it, off of the Spring Pin and remove the Spring from
the Base Frame. Depending on what you are replacing or fixing you may
be ready to reassemble the Mirror. If you are swapping Bases then you
may want to remove the Spring Pin to use in your new Base.
Reassemble
5. To reassemble the Mirror you just reverse the steps above. There are
a few things to watch out for and a few tips that make it easier. I will
list them in the order of reassemble.
A. Wrap a piece of tape around the hook, where it connects to the Spring,
to keep it from slipping off when you are struggling to retention the
Spring.
B. Feed the wires through the Base Frame and Base before you start reassembling
the unit and make sure that you feed them through the Mirror Housing 1st.
C. Install the Spring Pin into its seats before you begin reassemble.
Spread an end of the Spring Pin to insure that it can not fall out when
you are struggling to pretension the Spring.
D. Hook the Spring into the seat behind the Mirror Frame / Motor, on the
Base Frame, reinstall the Mirror Housing and the Mirror Housing to Base
Frame screws before you try to connect the other end of the Spring to
the Spring Pin. To get the Spring Hook onto the Spring Pin I used 2 strong,
long, narrow, Phillips screw drivers. I inserted them through the access
hole and kept the hinge open a little with a butter knife handle. By using
the structures in the Base for leverage and swapping the screw drivers
to get more tension I eventually got the Spring Hook aligned over the
Spring Pin. At this point I used the free screw driver to push down on
the Spring Hook while I removed the butter knife. This caused the screwdriver
that was keeping the tension on the Spring to slip out of the Spring Hook
and the down force from the second screw driver forced the Spring Hook
down onto the Spring Pin. It takes some major coordination and patience
to get the Spring back on but it can be done.
E. A good tip for you if you need to replace the Mirror Housing. I had
a hard time finding Z31 Mirror Housings. Then one day I noticed a Nissan
Stanza and realized that the Mirror Housing on it was the same as the
Z31 Housing. The Bases are different but the Mirror Housing, Mirror Frame
/ Motor and, Wiring are the same. That is how I wound up learning how
to take these mirrors apart. Since then I have noticed that many other
Nissans also use the same Mirror Housing.
Well that concludes my attempt to provide information to other Z owner
/ mechanics. I know that some of this is a little confusing and my punctuation
needs some work but I hope you found it to be useful in some way.
If you have any questions or better ideas for doing any of this please
send me an e-mail.
Zbyter
1999-2001 © Copyright Igzotic Design. All Rights Reserved
Republished with permission on the Z Car Home Page Aug. 18, 2001